fromSomeBlog
We create a dynamic URL by creating a dynamic page with the [] syntax.
How? We add a pages/blog/[id].js file. This file will handle all the dynamic URLs under the /blog/ route
The router is a library provided by Next.js.
We import it from next/router:
import { useRouter } from 'next/router'
and once we have useRouter, we instantiate the router object using:
const router = useRouter()
Once we have this router object, we can extract information from it.
In particular we can get the dynamic part of the URL in the [id].js file by accessing router.query.id.
The dynamic part can also just be a portion of the URL, like post-[id].js.
So let’s go on and apply all those things in practice.
Create the file pages/blog/[id].js
Create the file pages/blog/[id].js:
import { useRouter } from 'next/router'

export default () => {
  const router = useRouter()

  return (
    <>
      <h1>Blog post</h1>
      <p>Post id: {router.query.id}</p>
    </>
  )
}
fromOfficialWebsite
Link
If you need to link to an external page outside the Next.js app, just use an <a> tag without Link.
If you need to add attributes like, for example, className, add it to the a tag, not to the Link tag
In Next.js, a page is a React Component exported from a .js, .jsx, .ts, or .tsx file in the pages directory. Each page is associated with a route based on its file name.
Next.js can serve static assets, like images, under the top-level public directory. Files inside public can be referenced from the root of the application similar to pages.
Image
Using primitive html image tag means you have to manually handle:
- Ensuring your image is responsive on different screen sizes
- Optimizing your images with a third-party tool or library
- Only loading images when they enter the viewport
And more. Instead, Next.js provides an Image component out of the box to handle this for you.
Images are lazy loaded by default. That means your page speed isn’t penalized for images outside the viewport. Images load as they are scrolled into viewport.
(the url didn’t include public)
Head
In addition to metadata, scripts that need to load and execute as soon as possible are usually added within the <head> of a page. Using a regular HTML <script> element, an external script would be added as follows:
<Head>
  <title>First Post</title>
  <script src="https://connect.facebook.net/en_US/sdk.js" />
</Head>
Script
next/script is an extension of the HTML <script> element and optimizes when additional scripts are fetched and executed.
export default function FirstPost() {
  return (
    <>
      <Head>
        <title>First Post</title>
      </Head>
      <Script
        src="https://connect.facebook.net/en_US/sdk.js"
        strategy="lazyOnload"
        onLoad={() =>
          console.log(`script loaded correctly, window.FB has been populated`)
        }
      />
      <h1>First Post</h1>
      <h2>
        <Link href="/">
          <a>Back to home</a>
        </Link>
      </h2>
    </>
  )
}
Notice that a few additional properties have been defined in the Script component:
strategycontrols when the third-party script should load. A value oflazyOnloadtells Next.js to load this particular script lazily during browser idle timeonLoadis used to run any JavaScript code immediately after the script has finished loading. In this example, we log a message to the console that mentions that the script has loaded correctly
CSS Modules
Important: To use CSS Modules, the CSS file name must end with .module.css.
This is what CSS Modules does: It automatically generates unique class names. As long as you use CSS Modules, you don’t have to worry about class name collisions.
Furthermore, Next.js’s code splitting feature works on CSS Modules as well. It ensures the minimal amount of CSS is loaded for each page. This results in smaller bundle sizes.
CSS Modules are extracted from the JavaScript bundles at build time and generate .css files that are loaded automatically by Next.js.
Global Modules
CSS Modules are useful for component-level styles. But if you want some CSS to be loaded by every page, Next.js has support for that as well.
To load global CSS files, create a file called pages/_app.js with the following content:
export default function App({ Component, pageProps }) {
  return <Component {...pageProps} />
}
This App component is the top-level component which will be common across all the different pages. You can use this App component to keep state when navigating between pages
Important: You need to restart the development server when you add pages/_app.js.
In Next.js, you can add global CSS files by importing them from pages/_app.js. You cannot import global CSS anywhere else.
The reason that global CSS can’t be imported outside of pages/_app.js is that global CSS affects all elements on the page.
You can place the global CSS file anywhere and use any name. So let’s do the following:
- Create a top-level
stylesdirectory and createglobal.cssinside.
Pre-rendering
Next.js has two forms of pre-rendering: Static Generation and Server-side Rendering. The difference is in when it generates the HTML for a page.
- Static Generation is the pre-rendering method that generates the HTML at build time. The pre-rendered HTML is then reused on each request.
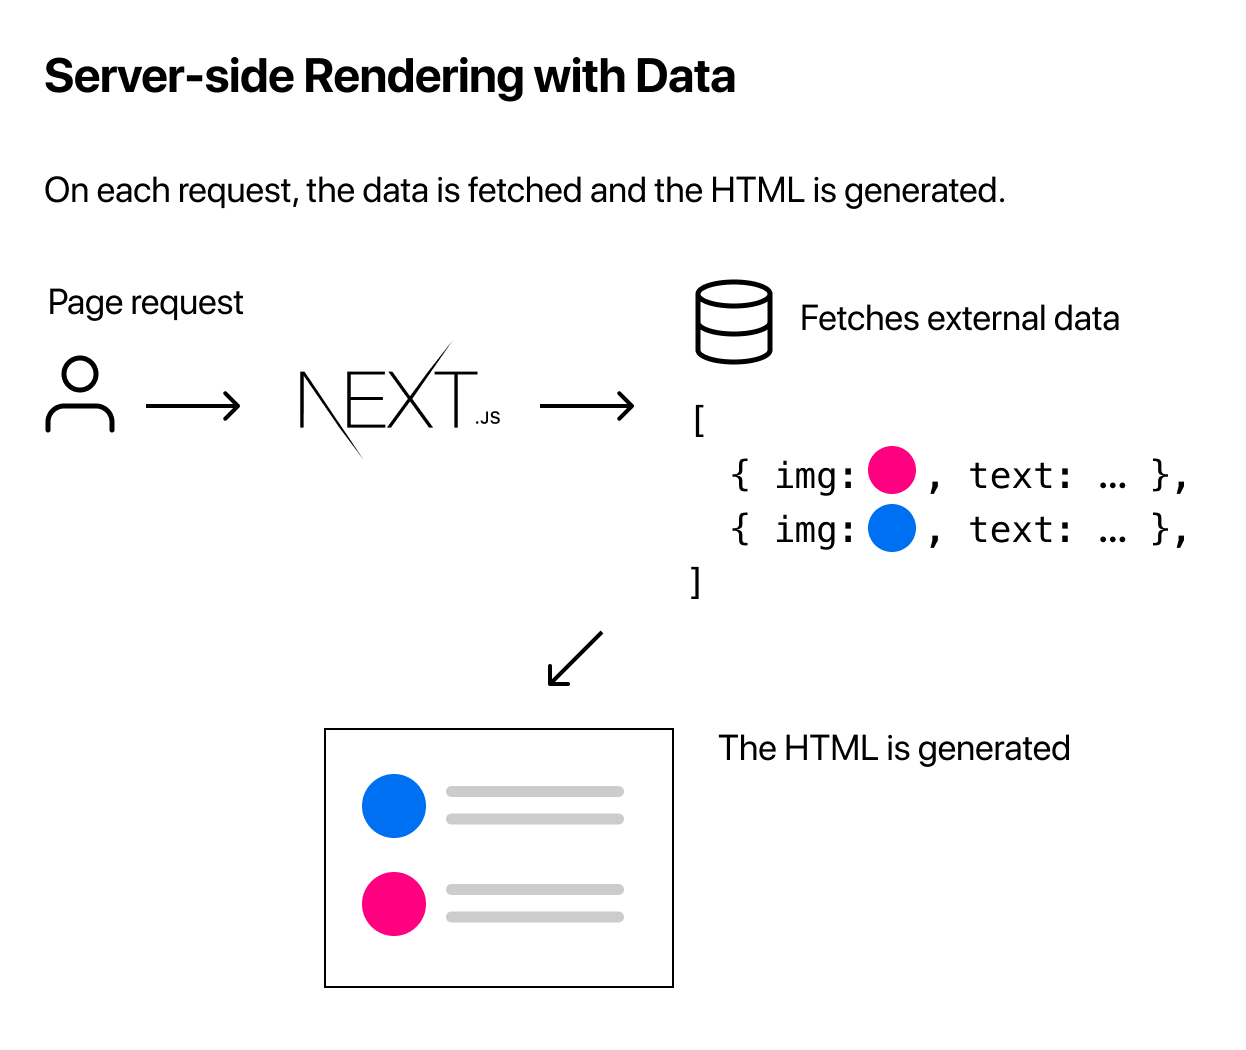
- Server-side Rendering is the pre-rendering method that generates the HTML on each request.
In development mode (when you run npm run dev or yarn dev), every page is pre-rendered on each request — even for pages that use Static Generation.
in Next.js, when you export a page component, you can also export an async function called getStaticProps.
getStaticProps
- In development (
npm run devoryarn dev),getStaticPropsruns on every request. - In production,
getStaticPropsruns at build time. However, this behavior can be enhanced using thefallbackkey returned bygetStaticPaths
If you need to fetch data at request time instead of at build time, you can try Server-side Rendering
To use Server-side Rendering, you need to export getServerSideProps instead of getStaticProps from your page.
export async function getServerSideProps(context) {
  return {
    props: {
      // props for your component
    }
  }
}
Because getServerSideProps is called at request time, its parameter (context) contains request specific parameters.
You should use getServerSideProps only if you need to pre-render a page whose data must be fetched at request time. Time to first byte (TTFB) will be slower than getStaticProps because the server must compute the result on every request, and the result cannot be cached by a CDN without extra configuration.
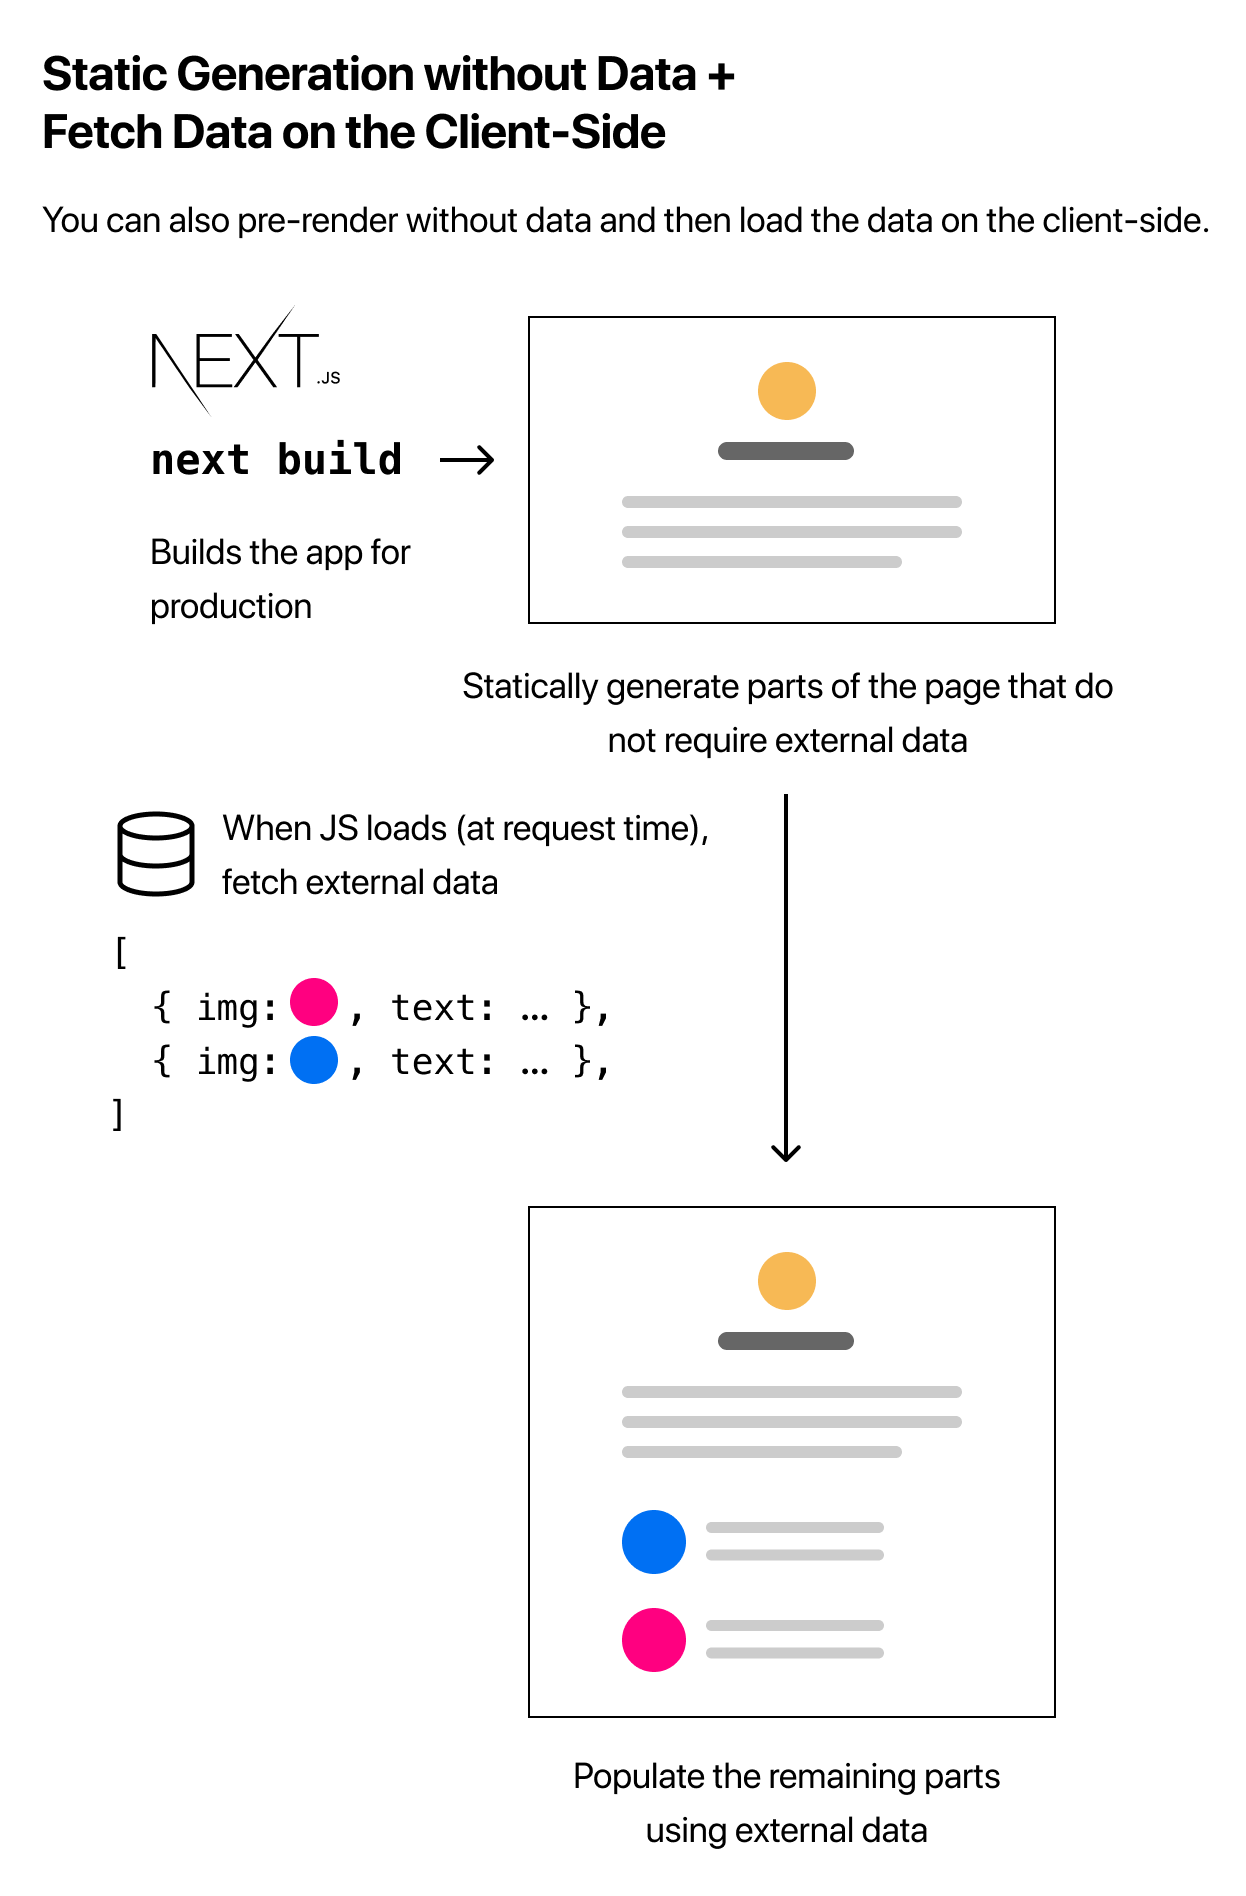
If you do not need to pre-render the data, you can also use the following strategy (called Client-side Rendering):
- Statically generate (pre-render) parts of the page that do not require external data.
- When the page loads, fetch external data from the client using JavaScript and populate the remaining parts.
Pre-rendering and Data Fetching
Fetching Data at Request Time
If you need to fetch data at request time instead of at build time, you can try Server-side Rendering:

To use Server-side Rendering, you need to export getServerSideProps instead of getStaticProps from your page.
Using getServerSideProps
Here’s the starter code for getServerSideProps. It’s not necessary for our blog example, so we won’t be implementing it.
export async function getServerSideProps(context) {
  return {
    props: {
      // props for your component
    }
  }
}
Because getServerSideProps is called at request time, its parameter (context) contains request specific parameters.
You should use getServerSideProps only if you need to pre-render a page whose data must be fetched at request time. Time to first byte (TTFB) will be slower than getStaticProps because the server must compute the result on every request, and the result cannot be cached by a CDN without extra configuration.
Client-side Rendering
If you do not need to pre-render the data, you can also use the following strategy (called Client-side Rendering):
- Statically generate (pre-render) parts of the page that do not require external data.
- When the page loads, fetch external data from the client using JavaScript and populate the remaining parts.

This approach works well for user dashboard pages, for example. Because a dashboard is a private, user-specific page, SEO is not relevant, and the page doesn’t need to be pre-rendered. The data is frequently updated, which requires request-time data fetching.
SWR
The team behind Next.js has created a React hook for data fetching called SWR. We highly recommend it if you’re fetching data on the client side. It handles caching, revalidation, focus tracking, refetching on interval, and more. We won’t cover the details here, but here’s an example usage:
import useSWR from 'swr'

function Profile() {
  const { data, error } = useSWR('/api/user', fetch)

  if (error) return <div>failed to load</div>
  if (!data) return <div>loading...</div>
  return <div>hello {data.name}!</div>
}
Catch-all Routes
Dynamic routes can be extended to catch all paths by adding three dots (...) inside the brackets.
API routers
You should not fetch an API Route from getStaticProps or getStaticPaths. Instead, write your server-side code directly in getStaticProps or getStaticPaths (or call a helper function).
Here’s why: getStaticProps and getStaticPaths runs only on the server-side. It will never be run on the client-side. It won’t even be included in the JS bundle for the browser. That means you can write code such as direct database queries without them being sent to browsers.
A good use case for API Routes is handling form input. For example, you can create a form on your page and have it send a POST request to your API Route. You can then write code to directly save it to your database. The API Route code will not be part of your client bundle, so you can safely write server-side code.
Deploy to Vercel
The easiest way to deploy Next.js to production is to use the Vercel platform developed by the creators of Next.js.